Need For Speed World Events List
| Line 59: | Line 59: | ||
|-style="background:#E5E4E4;" | |-style="background:#E5E4E4;" | ||
|<center>20</center> || <center>Kempton Docks</center> || <center>11 kilometres</center> || <center>6 drivers</center> || <center>2 laps</center> | |<center>20</center> || <center>Kempton Docks</center> || <center>11 kilometres</center> || <center>6 drivers</center> || <center>2 laps</center> | ||
| − | |- | + | |- |
|<center>21</center> || <center>Little Italy</center> || <center>8 kilometres</center> || <center>6 drivers</center> || <center>2 laps</center> | |<center>21</center> || <center>Little Italy</center> || <center>8 kilometres</center> || <center>6 drivers</center> || <center>2 laps</center> | ||
| − | |||
| − | |||
|-style="background:#E5E4E4;" | |-style="background:#E5E4E4;" | ||
| − | |<center> | + | |<center>22</center> || <center>Lucky Towers</center> || <center>9 kilometres</center> || <center>6 drivers</center> || <center>2 laps</center> |
|- | |- | ||
| − | |<center> | + | |<center>23</center> || <center>Main Street</center> || <center>6 kilometres</center> || <center>6 drivers</center> || <center>2 laps</center> |
|-style="background:#E5E4E4;" | |-style="background:#E5E4E4;" | ||
| + | |<center>24</center> || <center>North Broadway</center> || <center>7 kilometres</center> || <center>6 drivers</center> || <center>2 laps</center> | ||
| + | |- | ||
|<center>25</center> || <center>North Road</center> || <center>9 kilometres</center> || <center>6 drivers</center> || <center>2 laps</center> | |<center>25</center> || <center>North Road</center> || <center>9 kilometres</center> || <center>6 drivers</center> || <center>2 laps</center> | ||
| − | |||
| − | |||
|-style="background:#E5E4E4;" | |-style="background:#E5E4E4;" | ||
| − | |<center> | + | |<center>26</center> || <center>Ocean View</center> || <center>11 kilometres</center> || <center>6 drivers</center> || <center>2 laps</center> |
|- | |- | ||
| − | |<center> | + | |<center>27</center> || <center>Oil Refinery</center> || <center>14 kilometres</center> || <center>6 drivers</center> || <center>2 laps</center> |
|-style="background:#E5E4E4;" | |-style="background:#E5E4E4;" | ||
| − | |<center> | + | |<center>28</center> || <center>Paradise Hotel</center> || <center>10 kilometres</center> || <center>6 drivers</center> || <center>2 laps</center> |
|- | |- | ||
| − | |<center> | + | |<center>29</center> || <center>Park Boundary</center> || <center>15 kilometres</center> || <center>6 drivers</center> || <center>2 laps</center> |
|-style="background:#E5E4E4;" | |-style="background:#E5E4E4;" | ||
| − | |<center> | + | |<center>30</center> || <center>Rosewood Central</center> || <center>9 kilometres</center> || <center>6 drivers</center> || <center>2 laps</center> |
|- | |- | ||
| − | |<center> | + | |<center>31</center> || <center>Rosewood College</center> || <center>8 kilometres</center> || <center>6 drivers</center> || <center>2 laps</center> |
|-style="background:#E5E4E4;" | |-style="background:#E5E4E4;" | ||
| − | |<center> | + | |<center>32</center> || <center>Rosewood Park Loop</center> || <center>7 kilometres</center> || <center>6 drivers</center> || <center>2 laps</center> |
|- | |- | ||
| − | |<center> | + | |<center>33</center> || <center>Route 55</center> || <center>10 kilometres</center> || <center>6 drivers</center> || <center>2 laps</center> |
|-style="background:#E5E4E4;" | |-style="background:#E5E4E4;" | ||
| − | |<center> | + | |<center>34</center> || <center>Savannah Street</center> || <center>10 kilometres</center> || <center>6 drivers</center> || <center>2 laps</center> |
|- | |- | ||
| − | |<center> | + | |<center>35</center> || <center>Silk Road</center> || <center>7 kilometres</center> || <center>6 drivers</center> || <center>2 laps</center> |
|-style="background:#E5E4E4;" | |-style="background:#E5E4E4;" | ||
| − | |<center> | + | |<center>36</center> || <center>Skyline Avenue</center> || <center>8 kilometres</center> || <center>6 drivers</center> || <center>2 laps</center> |
|- | |- | ||
| + | |<center>37</center> || <center>University Way</center> || <center>7 kilometres</center> || <center>6 drivers</center> || <center>2 laps</center> | ||
| + | |-style="background:#E5E4E4;" | ||
|<center>38</center> || <center>Waterfront</center> || <center>12 kilometres</center> || <center>6 drivers</center> || <center>2 laps</center> | |<center>38</center> || <center>Waterfront</center> || <center>12 kilometres</center> || <center>6 drivers</center> || <center>2 laps</center> | ||
|} | |} | ||
| Line 101: | Line 101: | ||
==Sprint Events== | ==Sprint Events== | ||
| − | Sprint racing is one of the two primary racing modes in the game (the other being circuit racing). In sprint events players have to go from point A to point B over a defined course around the map. All sprint events allow for a total of 6 drivers, but the race can be started with a minimum of 2 drivers. No cops will appear during these events, but traffic cars will spawn as usually. | + | Sprint racing is one of the two primary racing modes in the game (the other being circuit racing). In sprint events players have to go from point A to point B over a defined course around the map. All sprint events allow for a total of 6 drivers, but the race can be started with a minimum of 2 drivers. No cops will appear during these events, but traffic cars will spawn as usually. The player must complete the race within 60 seconds after the winner has finished, otherwise it counts as a disqualification. |
Revision as of 11:49, 29 August 2012

|
This page is protected from anonymous edits. This page is protected from edits by unregistered or anonymous users to minimize vandalism. If you wish to edit this page, please Log in. |
| This page is currently a work in progress. This means that the information on the page may not be complete. Feel free to add pertinent information.
|
This is the official Need For Speed: World events list, split in three different tables: Circuit events, Sprint events, and Team Escape events. Also in this page there is information about Pursuit Outruns, Treasure Hunt, and Meeting Places.
Contents |
Events-of-the-Day
Before the update to the game on August 21st 2012, all events were available 24/7, and the player just had to level up to unlock them. Now, a new system is in place, called Events-of-the-Day. This means that events will now dynamically change every day, and there are no level restrictions anymore, so every player can race in an event, as long as he has a car that meets the requirements (Class E cars, Class D cars, and so on). Some events are open, so the player can use any car. About 12 to 15 events will be available per day. The change will take place at 00:00 GMT each day.
Circuit Events
Circuit racing is one of the two primary racing modes in the game (the other being sprint racing). In circuit racing players have to complete 2 or more laps in a defined course around the map. All circuit events allow for a total of 6 drivers, but the race can be started with a minimum of 2 drivers. No cops will appear during these events, but traffic cars will spawn as usually. The player must complete the race within 60 seconds after the winner has finished, otherwise it counts as a disqualification. To extend the duration of the race, the player can activate the One More Lap powerup. This powerup can only be used once per race.
| # | EVENT NAME | DISTANCE | MAXIMUM DRIVERS | NUMBER OF LAPS |
|---|---|---|---|---|
| |
|
|
| |
| |
|
|
| |
| |
|
|
| |
| |
|
|
| |
| |
|
|
| |
| |
|
|
| |
| |
|
|
| |
| |
|
|
| |
| |
|
|
| |
| |
|
|
| |
| |
|
|
| |
| |
|
|
| |
| |
|
|
| |
| |
|
|
| |
| |
|
|
| |
| |
|
|
| |
| |
|
|
| |
| |
|
|
| |
| |
|
|
| |
| |
|
|
| |
| |
|
|
| |
| |
|
|
| |
| |
|
|
| |
| |
|
|
| |
| |
|
|
| |
| |
|
|
| |
| |
|
|
| |
| |
|
|
| |
| |
|
|
| |
| |
|
|
| |
| |
|
|
| |
| |
|
|
| |
| |
|
|
| |
| |
|
|
| |
| |
|
|
| |
| |
|
|
| |
| |
|
|
| |
| |
|
|
|
Sprint Events
Sprint racing is one of the two primary racing modes in the game (the other being circuit racing). In sprint events players have to go from point A to point B over a defined course around the map. All sprint events allow for a total of 6 drivers, but the race can be started with a minimum of 2 drivers. No cops will appear during these events, but traffic cars will spawn as usually. The player must complete the race within 60 seconds after the winner has finished, otherwise it counts as a disqualification.
| # | EVENT NAME | DISTANCE | MAXIMUM DRIVERS |
|---|---|---|---|
| |
|
| |
| |
|
| |
| |
|
| |
| |
|
| |
| |
|
| |
| |
|
| |
| |
|
| |
| |
|
| |
| |
|
| |
| |
|
| |
| |
|
| |
| |
|
| |
| |
|
| |
| |
|
| |
| |
|
| |
| |
|
| |
| |
|
| |
| |
|
| |
| |
|
| |
| |
|
| |
| |
|
| |
| |
|
| |
| |
|
| |
| |
|
| |
| |
|
| |
| |
|
| |
| |
|
| |
| |
|
| |
| |
|
| |
| |
|
| |
| |
|
| |
| |
|
| |
| |
|
| |
| |
|
| |
| |
|
| |
| |
|
| |
| |
|
| |
| |
|
| |
| |
|
| |
| |
|
| |
| |
|
| |
| |
|
| |
| |
|
| |
| |
|
| |
| |
|
| |
| |
|
| |
| |
|
|
Team Escape Events
In Team Escape events you and your team battle against a horde of cops. All drivers start in the same location and there are different routes marked on the map, so it is up to you and your team to choose the best one to go from point A to point B. All drivers must reach the finish line within the time limit to earn the best rewards, while evading tons of cops, roadblocks, spike stripes and Rhino SUVs.
Even though the objective is to outrun the cops, if anyone on the team gets busted, the team will lose a strike. Once a strike is consumed the busted player will spectate the nearest teammate for 10 seconds before respawning. If there are no strikes left the busted player will not respawn. If a player runs out of time before reaching the finish line, he/she will be busted with no chance of respawning (even if there are strikes left). Each event has its own characteristics, such as available strikes, time limit, heat level (the higher the number, the harder the cops will go after the team), etc.
Some cars were created specifically for this game mode. They are called "Juggernauts" and they are able to ram cops more easily than all the other cars due to the increased weight. The "Juggernaut" cars are the following: Bentley Continental Supersports Coupe Red Juggernaut, Chevrolet El Camino SS Team Blue Juggernaut, Dodge Charger SRT-8 Super Bee Blue Juggernaut, Dodge Viper SRT-10 Blue Juggernaut; Pontiac GTO Blue Juggernaut (1965).
| # | EVENT NAME | TIME LIMIT | MAXIMUM DRIVERS | LEVEL REQUIRED | TIER RESTRICTIONS | STRIKES AVAILABLE | HEAT LEVEL |
|---|---|---|---|---|---|---|---|
| |
|
|
|
|
|
| |
| |
|
|
|
|
|
| |
| |
|
|
|
|
|
| |
| |
|
|
|
|
|
| |
| |
|
|
|
|
|
| |
| |
|
|
|
|
|
| |
| |
|
|
|
|
|
| |
| |
|
|
|
|
|
|
Pursuit Outruns
Pursuit Outrun is a singleplayer game mode that puts the player against the cops. There are 5 heat levels available, which rise as the player keeps a pursuit going for more and more time without being busted. There is no time limit for pursuits - the cops will keep coming until the player is either busted or manages to escape. To escape, the player must first get out of the cops' line of sight, until the information "cooldown" appears on the bottom of the screen. In "cooldown" mode the player has to avoid any cop car until the "cooldown" bar is filled. Once it is filled, the player successfully escaped the pursuit and will earn rewards. There are spots on the map that make the "cooldown" bar fill faster. If the player is busted the heat level will be reset to level 1 and the player will lose some money. Currently there are four Pursuit Outruns available for any player who is Level 2 or above. There are no car restrictions in this type of events.
- Kempton Pursuit
- Rockport Resistance
- Rosewood Raid
- Silverton Showdown
Treasure Hunt
Treasure Hunt is a daily free roam game mode where Treasure Gems will be hidden in different parts of the game map. The player's task is to find and collect all 15 gems to receive reputation, cash, and performance parts or powerups. Treasure Hunt can be played at any time while the player is in free roam mode. The gems' locations are resetted at 00:00 GMT each day. The hunt can be completed across multiple game sessions. For instance, a player can login early in the morning and collect 5 out of 15 gems. Then, later that day, the player can login again and collect the remaining 10 gems to complete the daily hunt. However, keep in mind that you must find and collect all 15 gems on the same day, otherwise it won't count.
To start the hunt just open the game map. A treasure area indicator shows the general area where all the gems can be found, so make your way to that part of the map. Once you are there, observe your mini-map. A green-colored radar will appear whenever you are close to a gem, indicating the direction and distance to it. Use that to locate and collect each gem by driving through it. A Treasure HUD, located at the bottom center of your screen, allows you to track the number of gems you have collected so far for that day. A Treasure Hunt Streak icon above the mini-map radar shows the number of consecutive days in which you have completed the Hunt. The bigger your streak the better rewards you will earn. In case you miss a day, the Treasure Hunt Streak icon will turn red. Complete a Treasure Hunt and you will get the option to either restart the streak from day one or spend 500 Speedboost to continue where you left off.
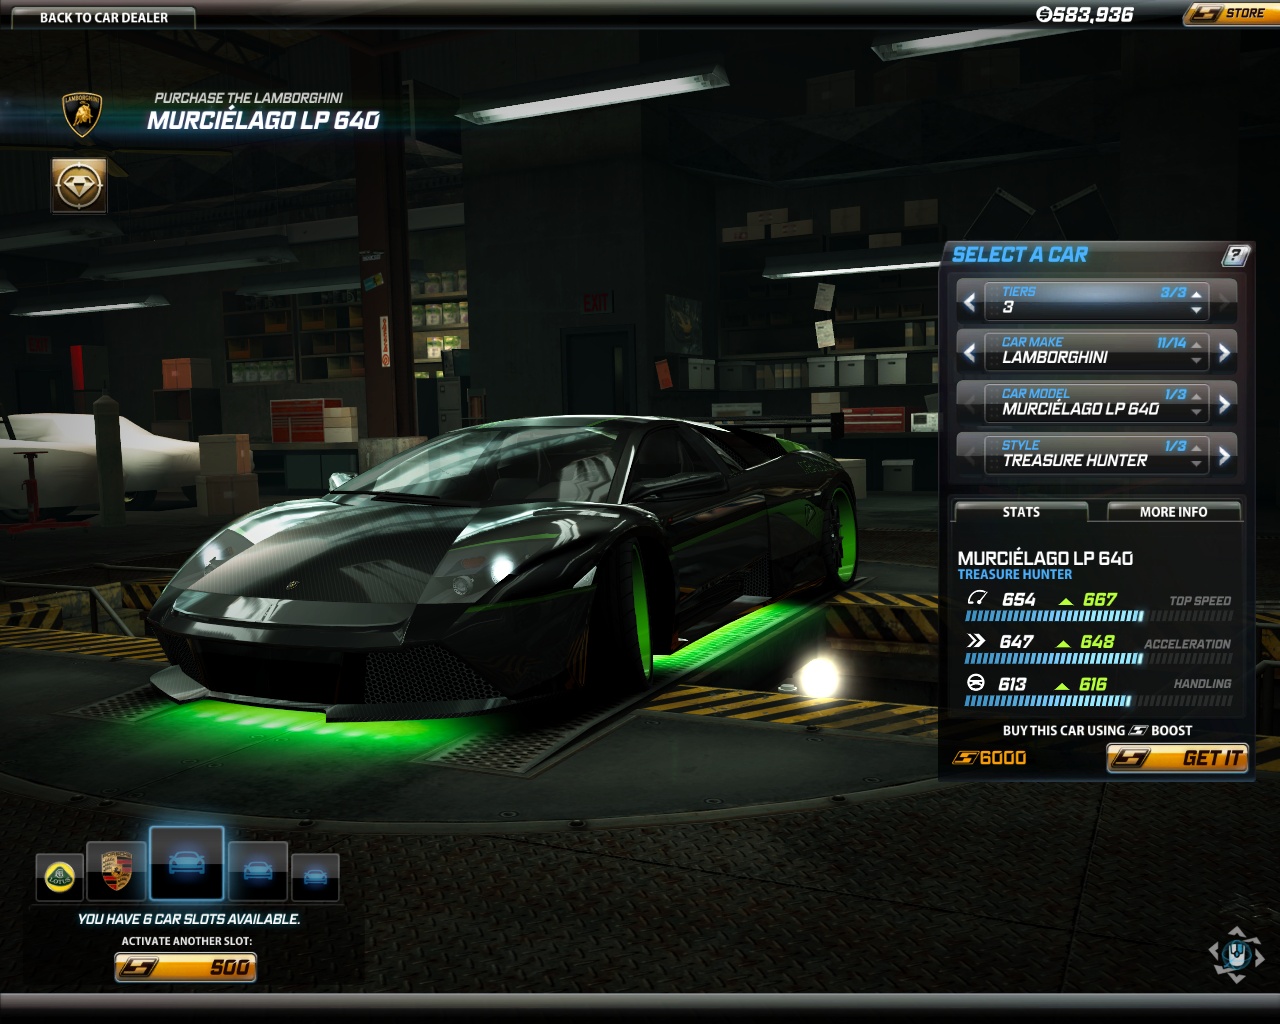
To make your life easier, there are three cars which show the location of all 15 gems in the game map: the BMW M1 Procar Treasure Hunter, the Lamborghini Murciélago LP640 Treasure Hunter and the Porsche Cayman S Treasure Hunter.
Meeting places
Meeting places are places in the game map where the players can show off their car, alone or with other players. A photo mode is available in these two locations, so the player can take photos of his/her car to share with others. Currently there are two meeting events in the game, and both are located within a stadium. These meeting places are open to anyone who is Level 2 and above.
- Hickey Field Stadium (Rosewood)
- Riverfront Stadium (Downtown Rockport)